Work more efficiently and precisely with crops and avoid long-standing Lightroom bugs:
- View photo and crop sizes in pixels, inches, centimeters, and megapixels; see rotation and mirroring.
- Create crop presets and apply them to many photos at once; set the orientation, angle, position and total size; assign keyboard shortcuts.
- Set an exact crop size in pixels, inches or centimeters.
- Copy crops from one photo to another, even if the photos are in different formats.
- Prepare multiple crops for a set of photos all at once.
- Divide contact sheets into individual frames.
- Set the absolute rotation of many photos at once.
- Adjust crops precisely while zoomed in Develop (no longer needed in Lightroom 15 and later).


Any Crop avoids a long-standing Lightroom bug, where crop settings are sometimes copied incorrectly between different image formats and orientations (Adobe doesn’t consider this a bug).
Try it for free for 30 days. Buy a license at a price you name.
Download and Install
Any Crop requires Lightroom 6 / CC 2015 or Lightroom Classic. (The newer cloud-focused Lightroom doesn’t support plugins.)
- Download anycrop.1.25.zip.
- If you’re upgrading from a previous version of Any Crop, exit Lightroom, delete the existing anycrop.lrplugin folder, and replace it with the new one extracted from the downloaded .zip. Restart Lightroom and you’re done.
- If this is a new installation, extract the folder anycrop.lrplugin from the downloaded .zip and move it to a location of your choice.
- In Lightroom, do File > Plug-in Manager.
- Click Add, browse and select the anycrop.lrplugin folder, and click Select Folder (Windows) or Add Plug-in (Mac OS).
The free trial is for 30 days—after that, you’ll need to buy a license.
Buy a License
- Buy a license at a price you think is fair:
The license includes unlimited upgrades. Make sure you’re satisfied with the free trial before buying. - Copy the license key from the confirmation page or confirmation email.
- Do File > Plugin-Extras > Any Crop > Crop.
- Click Buy.
- Paste the key into the License key box and click OK.
Using Any Crop
The menu command File > Plug-in Extras > Any Crop > Crop opens a floating panel that displays information about the current photo and its crop. In the panel, you can define and apply presets and reset the current crop.
You can position the panel anywhere on the screen. Unfortunately, the panel won’t stay on top (a limitation of Lightroom). To keep the panel visible, tuck it under the upper-left corner of the main window, with just the left half of the panel showing:

That will keep the panel visible without sacrificing much screen real estate. If the panel disappears, just do Any Crop > Crop again to bring it to the top.
Units
By default, a crop’s dimensions are shown in pixels. Use the Units drop-down menu to change that to inches or centimeters. Then set the resolution to the same value you’ll use when you print, otherwise the size shown by Any Crop won’t be accurate.
To export the photo at the exact size shown by Any Crop, uncheck the Export setting Resize to Fit and set Resolution to the same value shown in Any Crop.
Presets
Any Crop provides crop presets for all the common aspect ratios, and you can add your own.
To apply a preset, select it from the Preset dropdown menu. If you select Apply to all, the preset will be applied to all the selected photos, not just the current (most-selected) photo.
To define a new preset, select New… from the menu.
By default, the new preset will fit the largest possible crop rectangle of the given ratio inside the target image’s current crop, matching its landscape or portrait orientation. Checking Use the current image’s crop will define the preset to also use the angle, orientation, position, and size of the current image’s crop. You can control which of these are included in the preset by choosing the corresponding options.
Tip: To edit or delete a preset, you first have to select it, which will apply it to the current photo. To avoid modifying the current photo, first deselect all photos by doing Edit > Select None. Then select the desired preset and invoke Edit or Delete from the preset menu.
If you find yourself frequently manually adjusting a crop after applying a preset, in the Edit window check the option Open the Crop tool in Develop after applying.
Copy and Paste Crops
To copy a crop from the current photo to one or more target photos, do File > Plug-in Extras > Any Crop > Copy. Then select the target photos and do Paste. By default this will copy not just the aspect ratio but the angle, relative position, and relative size of the crop. But you can select which of these attributes is copied:

Unlike Lightroom, Any Crop correctly copies the crop settings between photos of different formats, e.g. from a raw to JPEG.
Applying Multiple Crop Presets
Use the Batch command to prepare multiple crops of a set of photos. For example, once you have an edited set, you may wish to prepare crops at 8.5 x 11 for printing, 3 x 4 for iPad, 5 x 8 for Android, and 9 x 16 for HDTV.
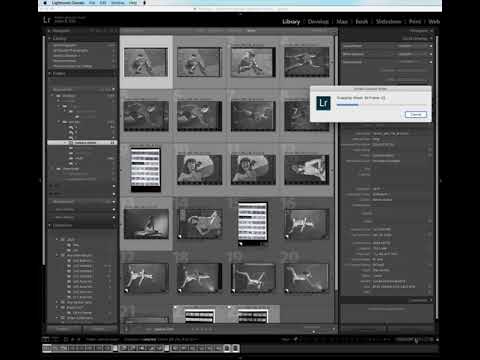
Select the photos and do File > Plug-in Extras > Any Crop > Batch. Choose a crop preset, a collection set or publish service, and the name of a collection within that set or service. Any Crop will create the collection if it doesn’t exist, and it will place virtual copies of the selected photos in the collection, cropped by the preset:

Uncheck Place virtual copies in collections to stop Batch from creating the collections.
You can apply up to 15 presets at a time. Then you can review the individual virtual copies and, if necessary, adjust their crops.
Tip: For each of the presets, set the option Same number of pixels as target image’s current crop. This will ensure that if the original image has already been cropped, the crop created by the preset will have the same number of megapixels and will be centered over the original crop. Otherwise, the preset’s crop will be placed inside the original crop, making it smaller than you probably want.
Adjusting Crops while Zoomed in Develop
Note: After 18 years, Adobe finally implemented cropping while zoomed in the built-in Crop tool. So Any Crop’s Adjust Crop command is no longer needed!
To precisely adjust a crop while zoomed in Develop, do File > Plug-in Extras > Adjust Crop:
This window is a floating panel—move it outside of the main Lightroom window, and you’ll be able to zoom and pan the photo in Develop without closing the panel. See it in action:
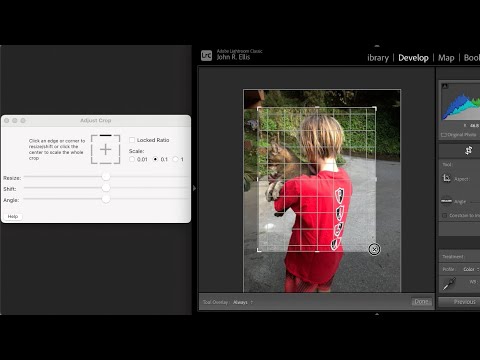
In the Adjust Crop window, click an edge or corner icon and then adjust the Resize slider to move that edge or corner. Change Scale to move in smaller or larger increments. Resize obeys the setting of the Crop tool’s lock, maintaining the aspect ratio if it is locked.
To increase or decrease the size of the crop, maintaining its aspect ratio and center, click the + icon and then adjust the Resize slider.
To move the center of the crop, click an edge or corner icon, and then adjust the Shift slider.
Move the Angle slider to adjust the crop angle.
Normally, Adjust Crop displays changes to the crop immediately as you move its sliders. But if the option Preferences > Performance > Use Graphics Processor is set to Off (perhaps because you have an older computer), updates to the crop won’t be displayed until you stop moving the sliders.
To work around this Lightroom limitation, set the option File > Plug-in Manager > Any Crop > Settings > Use Adjust Crop when the graphics processor (GPU) is disabled. Note, however, that the History panel will fill up with very many extra steps as you adjust the crop.
Dividing Contact Sheets into Frames
The Divide Contact Sheet command divides a contact sheet into individual frames, one virtual copy or JPEG per frame, stacked with the sheet.
To divide a sheet, rotate it to level its strips and crop it to the edges of the strips. The Crop tool’s Auto often does a very good job of leveling the strips, but if they are skewed, try the Transform > Guided tool.
Then invoke File > Plug-in Extras > Divide Contact Sheet. (You can divide more than one sheet at a time.) The command provides step-by-step instructions for handling the gaps between strips, extra margin around frames, the number of rows and columns, previewing the cropped frames, setting the copy names of the virtual copies and the JPEGs, and setting a metadata field with the sheet and frame number.
The first video shows how to include the spaces between frames, the second how to exclude the spaces:
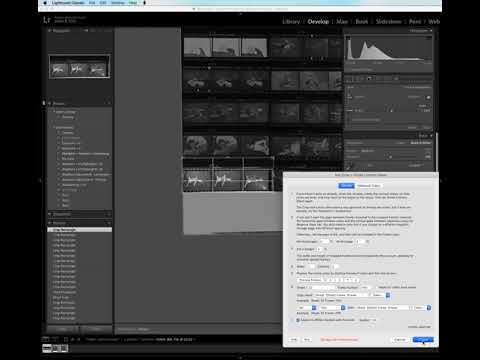
Measuring the gaps between strips and frames: If you want the cropped frames to include the horizontal and vertical spaces between frames, set Horizontal gap and Vertical gap to 0%. Otherwise, you’ll have to take a couple minutes to measure these gaps. But you’ll only need to redo the measurements if you change to a different negative storage page with different spacing.
- Rotate and crop the contact sheet to the edges of the frames, straightening the sheet with the Crop tool’s Auto or Transform > Guided if necessary.
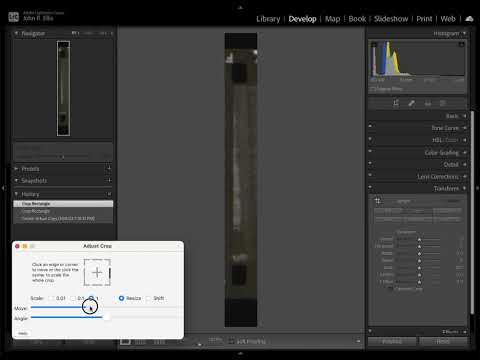
- Create a virtual copy of the sheet and make a small crop of the vertical gap between two frames, using the Adjust Crop command to get a precise crop.
- Repeat step 2 two more times with different vertical gaps.
- Create a virtual copy of the sheet and make a crop of the horizontal gap between two strips of frames, again using Adjust Crop.
- Repeat step 4 two more times with different horizontal gaps.
- Select the contact sheet and all 6 of the cropped gaps, do File > Plug-in Extras > Divide Contact Sheet, click on the Measure Gaps tab, then click Measure.
Setting Rotation of Photos
The Set Rotation command sets the absolute rotation of many photos at once (a function inexplicably absent from Lightroom):

Keyboard Shortcuts
To assign a keyboard shortcut to a preset, edit the preset and in the Menu shortcut dropdown at the bottom of the Edit window, select one of the menu commands Preset 1 through Preset 5. This lets you invoke the preset using File > Plug-in Extras > Any Crop > Preset i. Next, assign a keyboard shortcut to the menu command Preset i.
If you want more than five such shortcuts, edit the file Info.lua in the plugin’s folder and remove the “--” from the pairs of lines that start with {title = "Preset i". Restart Lightroom.
Use Any Menu to invoke any plugin menu item with just a few keystrokes and assign single-letter quick keys to the most-used menu items. Alternatively, to assign keyboard shortcuts:
Windows: You can use the standard menu keystrokes to invoke the Crop or Preset i commands. For example, to invoke Crop: ALT+F opens the File menu, U selects the Plug-in Extras submenu, Enter/Return opens the submenu, and C invokes Crop. To invoke Preset 1: ALT+F, U, Enter/Return, 1.
To reassign a different final keystroke to an Any Crop menu item, edit the file Info.lua in the plugin folder. Move the & in front of the desired letter in the menu command’s name, changing the name itself if necessary.
To assign a single keystroke as the shortcut, download and install the free, widely used AutoHotkey. Then in File Explorer navigate to the plugin folder anycrop.lrplugin. Double-click Install-Keyboard-Shortcut.bat and restart your computer. This defines the shortcut Ctrl+Alt+C to invoke Crop and Ctrl+Alt+1 to invoke Preset 1. To change the shortcuts, edit the file Keyboard-Shortcut.ahk in Notepad and follow the instructions in that file.
Mac OS: In System Settings > Keyboard > Keyboard Shortcuts > App Shortcuts, click + to add a new shortcut. In the Application menu, tediously scroll to the bottom and select Other… Navigate to Applications > Adobe Lightroom Classic and select Adobe Lightroom Classic.app. In Menu title type three spaces followed by the name of the menu command, e.g. “Crop” or “Preset 1” (case matters and don’t enter the quotes). In Keyboard shortcut type the desired key or key combination.
Support
Please send problems, bugs, suggestions, and feedback to ellis-lightroom@johnrellis.com.
I’ll gladly provide free licenses in exchange for reports of new, reproducible bugs.
Known limitations and issues:
- If the crop doesn’t change immediately as you change the Move and Angle sliders in the Adjust Crop panel, Lightroom’s use of the graphics processor (GPU) may be disabled. See here for a workaround.
- Any Crop requires Lightroom 6 / CC 2015 or Lightroom Classic—it relies on features missing from earlier versions.
Version History
1.2
- Initial release.
1.3
- Assign keyboard shortcuts to presets.
- Option for preset to leave Crop tool open.
- Worked around intermittent Lightroom bug causing Any Crop to raise an error when you delete a photo.
1.4
- Worked around the Lightroom bug causing the aspect ratio to revert to Original after applying a preset and then trying to resize the crop. Any Crop now switches to Library, applies the preset, then switches back to Develop. If this continues to fail for you, please contact me at the support email address above.
1.4
- Removed the workaround introduced in version 1.4, since it behaved unpredictably due to Lightroom bugs. Documented above the inconvenient user workaround, which is to manually switch to Library before applying an Any Crop preset.
- If a photo’s current aspect ratio matches its original ratio, “Original” is now always displayed in the Preset menu, even if there’s a preset with a matching ratio.
1.6
- The Set Rotation command sets the absolute rotation of a batch of photos.
1.8
- The Divide Contact Sheet command divides contact sheets into individual frames.
1.9
- Worked around Windows Lightroom bug in Divide Contact Sheet that caused an Extra Margin value of 5.00 to be displayed as “00”.
1.10
- Increased the maximum number of presets to be applied in Batch to 15.
1.11
- Worked around a Lightroom bug that caused Any Crop to show an error when Select Subject or Sky is clicked.
1.12
- Fixed bug when no photos are selected (introduced in the 1.11 bug fix).
1.13 2022-07-06
- Added the option Place virtual copies in collections (on by default) to the Batch command; unchecking the option prevents creation of the collections.
- Added the preset size option Fit inside photo, which makes the crop as large as possible inside the entire photo.
- Worked around another instance of the error “attempt to index a nil value” resulting from an internal Lightroom bug triggered by Delete Rejected Photos command on Windows.
- When displaying a preset that matches the current crop, Any Crop will prefer the preset (if any) that has default values for its other settings.
- Fixed display glitch with “pixels/cm” on Mac.
- Updated the Set Rotation command to remove the workarounds for the bugs in photo:rotateLeft() and :rotateRight(), which were fixed in Lightroom 11.4.
1.14 2022-07-9
- If Batch is invoked on photos in collections, the virtual copies created in those collections are removed.
- Restored the workaround to a Lightroom Windows SDK bug where a collection name entered in Batch was ignored if you didn’t move the keyboard focus to another control.
1.15 2022-10-09
- Adjust Crop command for making fine adjustments while zoomed in Develop.
1.16 2022-10-17
- Added Locked Ratio checkbox to Adjust Crop.
- Replaced Adjust Crop’s Resize/Shift radio buttons with separate Resize and Shift sliders.
1.17 2022-11-28
- The Preseti commands now work again after closing the Any Crop window.
- Invoking Paste while in Develop will paste settings just to the current photo, not other selected photos. This is closer to how Lightroom’s Paste Settings works, though if you do Paste in Library Loupe view, it will still paste to all the selected photos. (Lightroom doesn’t provide a way for plugins to tell the difference between Library Loupe and Library Grid views.)
1.18 2023-08-21
- Worked around Lightroom race condition in floating dialogs that was triggered by masks with very large numbers of brush strokes.
1.19 2023-12-07
- When using Divide, options for numbering frames top-to-bottom or bottom-to-top, left-to-right or right-to-left, and specifying the number of digits.
- Fixed bug with frame numbering when dividing multiple images.
1.20 2025-04-28
- Worked around a Lightroom 14.3 bug that prevents the use of negative crop angles on photos in portrait orientation.
1.21 2025-05-08
- Compatibility with the bug fix made in Lightroom 14.3.1.
1.22 2025-05-09
- Fixed a fat-fingered release script.
1.23 2025-09-29
- Increased the number of crop presets available to be assigned keyboard shortcuts from 5 to 16. If you want more than 5, see here.
- The Adjust command shows the current crop’s pixel dimensions and crop angle.
- The Adjust command has undo and redo buttons.
- If a photo has Super Resolution applied, the Crop and Adjust commands will show the super-resolution dimensions of the current crop, just as Lightroom’s built-in features do. (Super Resolution doubles the width and height of the photo.)
- When Crop applies a preset, it appears in Develop history as “Any Crop: preset–name“.
1.24 2026-06-26
- Applying a crop preset no longer opens the Crop window if it’s closed.
- Crop displays the numeric aspect ratios of the current crop and original photo.
- Fixed bug with display of uncropped dimensions.
- Selecting Original Ratio from the preset pop-up menu now adds a perspicuously named History step.
- Fixed issue with Constrain to Image getting set incorrectly. (This may have been a workaround for a Lightroom bug years ago that no longer occurs.)
1.25 2026-06-27
- Applying a preset via one of the Preset i menu commands will again obey the setting of Apply to all in the Crop window.