Use Google’s state-of-the art AI to describe, tag, classify, and search your photos and videos.
With Any Vision’s Prompt command (examples), you can:
- Generate captions, headlines, and the accessibility fields Alt Text and Extended Description
- Generate keywords and descriptions for specific uses, e.g. stock agencies
- Create your own specialized descriptions and classifications, such as the type of room and design style in real-estate photos or the clothing worn by riders in motorcycle photos
- Extract the numbers from athlete’s bibs and jerseys, motorcycles, and cars into fields or keywords
- Extract embedded text (OCR)
- Generate audio transcripts of videos
With Any Vision’s Classify command (examples), formerly called Analyze, you can:
- Tag your photos with objects, activities, landmarks, logos, facial expressions, and dominant colors
- Extract embedded text (OCR)
- Find photos with similar visual content and similar colors
With both commands you can:
- Store the tags and text in Lightroom’s keywords and metadata fields
- Recognize and translate from and to over 100 languages
- Search the tags and fields to make it much easier to find photos
- Export the tags and text into comma-separated text files
Any Vision uses Google Gemini and Cloud Vision, the AI technology underlying Google image search. Though you’ll have to get a Google Cloud key as well as an Any Vision license, you can use the Prompt command completely free, albeit slowly, or pay pennies per thousand photos to have it go very fast. You can use the Classify command for free on up to 212,000 photos in the first three months and then up to 1,000 photos every month thereafter. See Google Pricing for details.
Consider similar services with different features and pricing.
Try it for free (limited to 50 photos). Buy a license at a price you name.
Prompt Examples
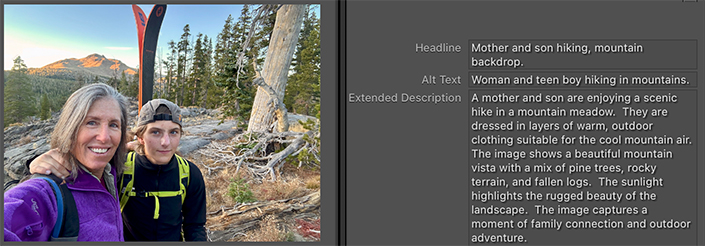
Headline, Alt Text, and Extended Description generated by the Prompt command:
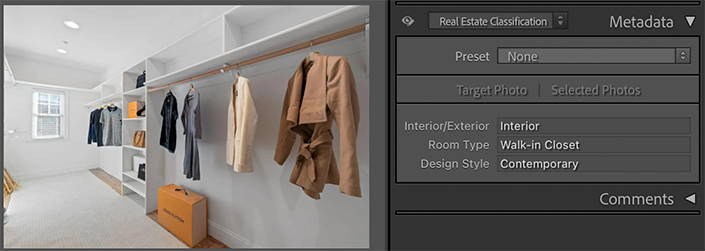
A user-written prompt classifying a real-estate photo as interior/exterior, its room type, and design style:
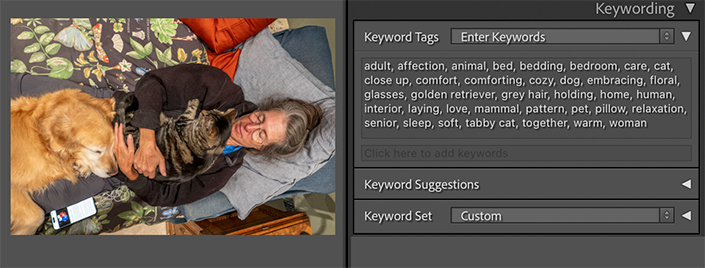
Keywords generated for a stock-photo agency:
Classify Examples
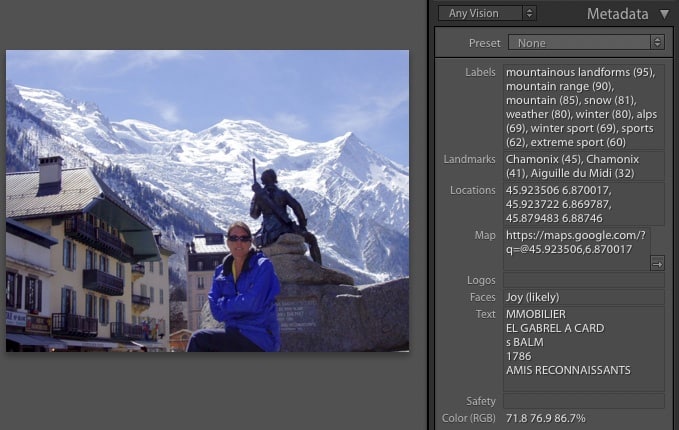
A Classify example showing labels, landmarks, face expression, and recognized text; Google has correctly located the photo within a few meters and extracted much of the visible text from the store signs and the granite plaque on the statue:
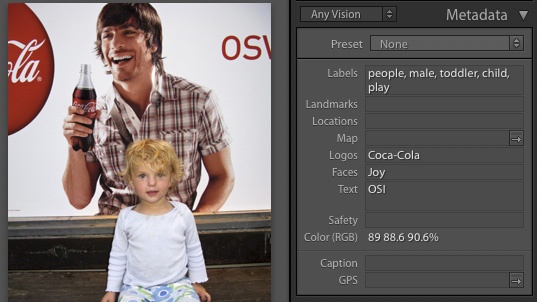
Example of logo detection, where the logos are partially obscured but still recognized:
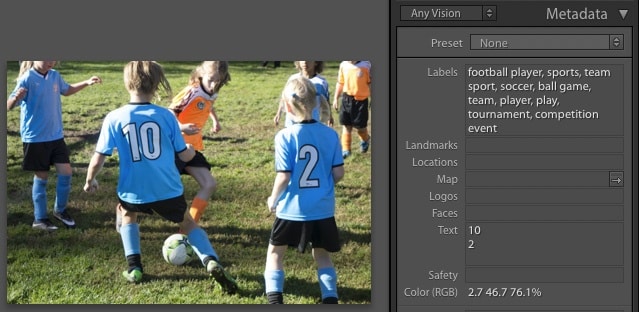
Correctly recognized jersey numbers:
Download and Install
Any Vision requires Lightroom 6.14 (CC 2015) or Lightroom Classic. (The newer cloud-focused Lightroom doesn’t support plugins.)
- Download anyvision.1.31.zip. (What’s changed in this version)
- If you’re upgrading from a previous version of Any Vision, exit Lightroom, delete the existing anyvision.lrplugin folder, and replace it with the new one extracted from the downloaded .zip. Restart Lightroom and you’re done.
- If this is a new installation, extract the folder anyvision.lrplugin from the downloaded .zip and move it to a location of your choice.
- In Lightroom, do File > Plug-in Manager.
- Click Add, browse and select the anyvision.lrplugin folder, and click Select Folder (Windows) or Add Plug-in (Mac OS).
- Get a Google Cloud key.
The free trial is limited to analyzing 50 photos—after that, you’ll need to buy an Any Vision license. Note that your Google Cloud key will allow you to process tens of thousands of photos for free (see here for details).
Licensing
To use Any Vision after the free trial ends, you’ll need both an Any Vision plugin license and a Google Cloud key tied to a billing account you set up with Google. Google Gemini and Cloud Vision costs little or nothing for most users—see Google Pricing for details.
Buy a License
- Buy a license for $14.95:
The license includes unlimited upgrades. Make sure you’re satisfied with the free trial before buying. - Copy the license key from the confirmation page or confirmation email.
- Do Library > Plug-in Extras > Any Vision > Classify.
- Click Buy.
- Paste the key into the License key box and click OK.
Get a Google Cloud Key
Setting up a Google billing account and getting a Cloud key is a little tedious but straightforward if you follow these steps exactly. I recommend that you arrange arrange two browser windows to be visible. (Unfortunately, Google doesn’t provide any way for an application like Any Vision to make this simpler.)
If you previously obtained a free API key for Prompt and want to add a billing account to enable Prompt to go much faster (at as little as pennies per thousand photos), skip to these steps.
If you’re upgrading from an older version of Any Vision that didn’t have the Prompt command (version 18 or earlier) and had already obtained a Google license key, skip to these last steps.
- Sign in to Google.com with an existing Google account (for example, your Gmail accout) or create a new one.
- Go to API Keys.
- Click Get API key:
- Agree to the terms of service.
- Click Create API key:

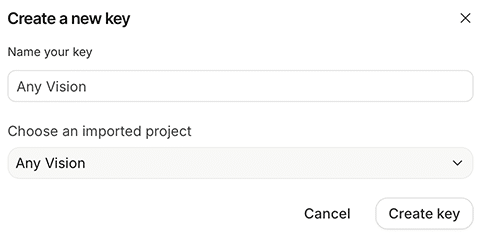
- Enter “Any Vision” into Name your key:

- Click the Choose an imported project drop-down menu, select Create project, enter “Any Vision”, click Create project, and select “Any Vision” as the project:

- Click Create key:
- Click the Copy API Key button:

- In Lightroom, do File > Plug-in Extras > Prompt, click Google Key, and paste the key:

- If you just want to use Prompt for free (somewhat slowly), you’re done. But if you want Prompt to go much faster or you want to use the Classify command, add a billing account in the following steps.
- Go to API Keys.
- Click Set up billing:

- Complete Steps 1 and 2, entering your country, agreeing to the terms of service, and entering your contact information and payment method. Click Start free at the bottom of Step 2 to complete the steps:

- Go to Cloud Vision API and click Enable:

- If you see Activate in the upper-right corner, click it:

- Go to Cloud Translation API and click Enable:

- If you’re upgrading from an older version of Any Vision that didn’t have the Prompt command (version 18 or earlier), go to Gemini API and click Enable, otherwise skip this step:
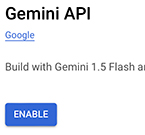
- Go to Credentials and click the underlined API key (it may have a different name):

- Select Don’t restrict key and click Save:
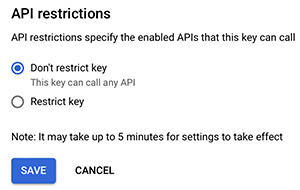
The change might take up to five minutes to take effect.
Google Pricing
Google’s pricing is pay-as-you go per photo or video, with no upfront charges. You can disable your billing account at any time.
You can see how much you’re spending in the Billing section of the Google Cloud console.
If you’re concerned about accidentally spending too much on Google services or someone stealing your Google license key, you can create a billing alert that will notify you when monthly spending exceeds a specified amount.
Prompt Pricing (as of August 2025)
Prompt uses Google’s Gemini to execute prompts. If you don’t associate a billing account with the API key you obtained, then your use of Gemini is free but very slow, and Google will use your photos to improve their products. Free use has strict rate limits depending on the model:
- gemini-2.5-flash-lite: 15 photos per minute and 1000 photos per day
- gemini-2.5-flash: 10 photos per minute and 250 photos per day
- gemini-2.5-pro: 5 photos per minute and 100 photos per day
You can can see the current rate limits for a model in the Prompt > Advanced tab by selecting it in the Default model drop-down. Once you associate a billing account with the key, prompts will execute much faster without rate limits.
Gemini’s pricing varies greatly according to the model, the pixel size of the photo, the length of the video, the length of the prompt text, the length of the result text, and the amount of “thinking” Gemini does (the more complicated the prompt, the more thinking).
Typical costs per 1000 photos:
- gemini-2.5-flash-lite: between $0.05 and $0.10
- gemini-2.5-flash: between $0.75 and $4.50
- gemini-2.5-pro: between $4.00 and $15.00
To see the cost of a prompt for a particular photo or video, select it in Library, do the Prompt command, select the prompt, click Edit, and do Preview Result. Videos will cost significantly more than photos, since Gemini examines one frame from each second of video. (You can change the frame sampling rate in the advanced actions of a prompt.)
Classify Pricing (as of December 2024)
Classify uses Google’s Cloud Vision and charges your billing account monthly for each photo you classify. But Google offers $300 free credit for new billing accounts (good for tens of thousands of photos), and the first 1000 photos classified each month are free.
Each of the seven features (Labels, Landmarks, Logos, Faces, Safety, Text, and Dominant Color) costs $1.50 / 1000 photos, except for Safety, which is free if you also select Labels. For example, selecting Labels and Landmarks costs $3.00 / 1000 photos, and selecting all seven features costs $9.00 / 1000 photos.
Translation of labels and other features to other languages costs $20 per million characters or about 100,000 distinct labels. (My main catalog has 30,000 images with 2500 distinct labels, and translating them to another language cost about $0.50.)
Though this may sound expensive for larger catalogs, Google provides incentives that lower the cost considerably. Most users will pay nothing or very little every month.
For each feature, the first 1000 photos are free each month. For example, if you select all seven features, you can classify 1000 photos monthly for free.
Google also offers $300 free credit for creating your first billing account (the credit must be used within three months). If you select just one feature (e.g. Labels), that’s enough for 200,000 photos, or nearly 29,000 photos for all seven features.
Prompt or Classify?
Should you use Prompt or Classify? There are some things that only one command can do:
Prompt: text descriptions, specialized classifications
Classify: GPS locations
In my (not exhaustive) testing, Prompt does a little better at keywording and extracting text, including athlete’s bibs and race cars. Classify does better at dominant colors. But try it for yourself—your mileage may vary.
Classify is 2-4 times faster.
Google provides free options for both. Classify can do tens of thousands of photos for free initially and 1000 photos per month thereafter, and there is no speed penalty. Prompt doesn’t have any limit on the number of free photos, but it limits processing to 15 photos/minute 1500 photos/day (flash model) or 2 photos/minute 50 photos/day (pro model).
Classify uses 2016-era technology, and Google doesn’t appear to have improved it much in recent years. Prompt uses the leading-edge Gemini AI service, and Google is actively improving it every month.
Using Prompt
With the Prompt command, you write text prompts, detailed instructions in your native language, that ask Google’s Gemini AI to describe your photos and videos, and you specify actions how Prompt should process Google’s answers and store them in metadata fields. For example, the built-in prompt IPTC Headline has this text prompt and action, which copies Google’s response to the IPTC Headline field:

Any Vision provides over a dozen built-in prompts, which you can use as-is or modify to suit your own needs.
To apply one or more prompts, select the desired photos and videos and do File > Plug-in Extras > Prompt, displaying all the currently defined prompts:
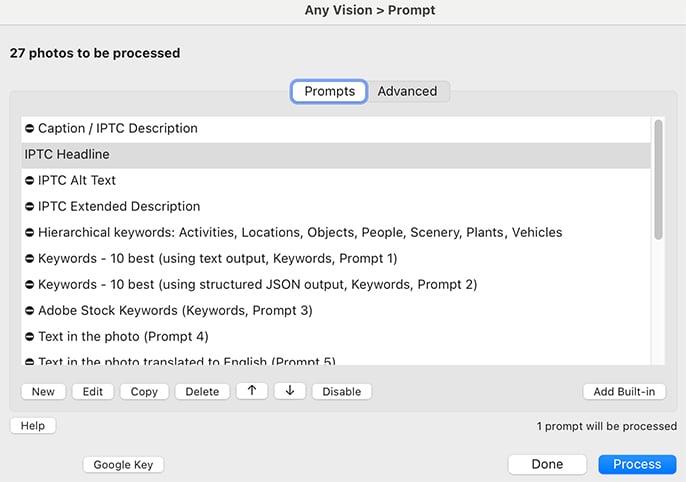
When you click Process, all the currently enabled prompts will be applied to each of the selected photos.
To enable or disable a prompt, select it and click Enable / Disable. Disabled prompts are indicated with ⛔︎.
I’ve tried to include a range of built-in examples showing how to use the various features. You can safely delete those you don’t use, recovering them later by clicking Add Built-in.
Some of the built-in prompts store their results in standard metadata fields such as Caption and Headline, and some add keywords. Many prompts store their results in custom metadata fields named Prompt 1 through Prompt 10, which you can view using custom Metadata panel tagsets.
Creating a Prompt
Click New to create a new prompt. Use a long, descriptive name to make it easy to remember what it does.
Enter your text instructions in the Prompt box. Crafting a good prompt takes a lot of trial-and-error at first. The built-in prompts give lots of examples, and Google has a detailed introduction suitable for non-programmers. For more advanced uses, you can have metadata (e.g. keywords) from the photo being processed inserted into the prompt text—see here for details.
The result will be generally be in the same language as the text prompt. You can include a specific language in the instructions, e.g. “Use English for the description”. Google Gemini knows over 40 languages.
Test out your prompt by clicking Preview Result, which will display Google’s response for the currently selected photo, along with the estimated cost per thousand photos. Use the < and > buttons to move to the previous or next photo and then click Preview Result again.
Any Vision caches the Google result and Preview Result will resend the photo and prompt to Google only if you change the prompt or a related parameter. But rarely Google might hiccup without any indication, and if you suspect that, you can force Preview Result to resend to Google by checking Refresh Google response.
You can tell Google how you’d like the output formatted, e.g. as a comma-separated list or one item per line. Google usually follows your instructions but sometimes doesn’t. If you’re technically minded, you can tell Google to generate structured output by checking Use JSON schema for output; see here for details.
After supplying the prompt text, add one or more actions by clicking Add an action. The actions specify how to process the Google result and where to store it in keywords and metadata fields. The Change advanced options action lets you override various Google settings about how it executes prompts.
After Google returns a response, the actions are applied in order. By default, the text results from the previous action are used as input to the next action, though some of the actions let you use the original results from the prompt. Preview Result will show the results of actions that change the text results but won’t execute the actions that store in keywords or metadata fields.
Explanations of the various action types follow:
Action: Copy to field
The Copy to field action copies the prompt results to any of 49 standard metadata fields and the 10 custom Prompt fields. These are all visible in the Library Metadata panel.
Enable From JSON output for prompts with JSON schemas. Using a schema often stops Gemini from generating introductions like “Here is a caption:” and other extraneous text.
Action: Replace pattern
The Replace pattern action transforms the Google response, replacing all occurrences of the pattern with a replacement. The patterns and replacements are a subset of full regular expressions, documented here.
When Include unmatched text is checked, then any text in the input that doesn’t match the pattern is included in the output. When unchecked, only the replacements of text matched by the pattern are included in the output.
See the built-in prompt Runner’s bibs for an example, where numbers are extracted from recognized text and output, one per line.
Use the Preview Result button for troubleshooting pattern/replacements.
Action: Assign to keywords
The Assign to keywords action interprets the response as a list of keywords and assigns them to the photo. The options:
text separated by commas, semicolons, or newlines: The keywords are separated by commas, semicolons, or newlines.
lines with “name: value”: Lines of the form “name: value” create hierarchical keywords name > value. For example, the response lines:
Room Type: Bathroom
Design Style: Contemporary
will create keywords Room Type > Bathroom and Design Style > Contemporary.
JSON output: Interprets the response as JSON created by the prompt option Use JSON schema for output. String values create leaf keywords and property names create parent keywords. For example, this JSON response:
{"What": {
    "Room": "Bathroom",
    "Style": ["Contemporary", "Transitional"]}
will create keywords What > Room > Bathroom, What > Style > Contemporary, and What > Style > Transitional.
Create keywords under parent keyword: If given, all keywords will be created under this parent keyword. It can be a hierarchical keyword, e.g. Home > Style.
Create keywords in subgroups A, B, C, …: If checked, all leaf keywords will be created under a parent keyword whose name is the leaf keyword’s first letter. For example, the keyword mountain would be placed under the parent keyword M. This works around a longstanding (and shameful) Lightroom bug on Windows where it chokes if it tries to display more than about 1500 keywords at once.
Set “Include on Export” attribute of keywords: When set, all created keywords will have that attribute set, allowing them to be included with a photo when it is exported.
Remove previous keywords under that parent: When a parent keyword is specified, then before assigning the new keywords to the photo, all previous keywords under that parent are removed from the photo.
Action: Change advanced options
The Change advanced options action lets you set parameters controlling Google’s execution of the prompt:
Temperature: A number between 0 and 2, defaulting to 0. Lower values create more deterministic responses, while higher values create more diverse or creative results that are more likely to vary each time the prompt is executed on the photo.
Model: The AI model used by Google Gemini to execute the prompt. See here for more details.
Image size: The maximum pixel size of the long edge of images sent to Google. Images larger than this are downscaled. The default is 3072, the largest that Google will accept. Google recommends the largest size, but if your network connection or computer is slow, a smaller image size will export from Lightroom and upload to Google faster. Setting the image size to 0 pixels prevents photos from being sent to Google, useful for “text only” prompts that refer to photo metadata via tokens but don’t use the photo.
Video format: The resolution of videos sent to Google—lower resolution videos will upload faster. But Lightroom exports video very slowly, so if you have an average consumer Internet connection, it could be faster to send the original videos to Google rather than wait for Lightroom to export them at smaller size.
Safety category: Specifies where Google should refuse to analyze photos and videos it thinks belong to various “safety” categories. Regardless of what you specify here, Google will sometimes refuse to process content it (often mistakenly) thinks is sexually explicit.
Action: Transform with Lua code
The Transform with Lua code action is an advanced option for those with programming experience, transforming the response with the executed code. The code should be a a block of statements ending with a return. The returned string value will be used by subsequent actions.
The following global variables are available to the code:
Debug: TheDebugmodule from the Debugging Toolkit. The functionsDebug.logn()andDebug.lognpp()can be used to log debugging output to the file debug.log in the anyvision.lrplugin folder.
hierarchy (table, levels, unknown)converts a flat keyword table into a hierarchical keyword table. For example:
   hierarchy ({Order = "Carnivora", Family = "Canidae", Genus = "Canis",
            Species = "Canis familiaris"},
        {"Family", "Genus", "Species"}, "Unknown")
returns this hierarchical keyword table:{Carnivora = {Canidae = {Canis = "Canis familiaris"}}}
The Assign to keywords from: JSON action will then create the hierarchical keywordCarnivora > Canidae > Canis > Canis familiaris. Theunknownparameter specifies which name should be used for a missing level. See the built-in prompt Taxonomic identification of plant or animal for an example use of this function.json: If the prompt option Use JSON schema is checked, the resulting JSON is represented as a Lua value.
photo: The current photo (anLrPhotoobject).
parseJSON (string): Parses the JSON contained instringand returns a Lua table repesenting the JSON object; returns nil if there’s a syntax error. Useful for prompts that ask Gemini to return JSON but don’t include JSON schemas.
text: The response text.
In addition, the global namespace contains all the functions available to plugins, including the function import() for importing modules from the Lightroom Plugin SDK.
JSON Schemas
In the prompt text, you can tell Google how you’d like the output formatted, e.g. as a comma-separated list or one item per line. Google usually follows your instructions but sometimes doesn’t. If you’re technically minded, you can tell Google to generate structured output conforming to your requirements by checking Use JSON schema for output and providing a schema. The response text will be formatted according to that schema.
See the built-in prompt Classify real estate photos for an example. It uses a JSON schema to force the keyword Room Type to be one of fixed set of values.
Read Google’s sketchy documentation, but I’ve found that the use of schemas requires trial-and-error. With the simple built-in prompts like Caption or IPTC Headline, the schemas stop the Gemini models from including extraneous text like “Here is a caption:”. Schemas may be more reliable with the newer Gemini 2 models than the 1.5 models.
Using Tokens to Insert Metadata into Prompts
Using tokens, you can insert metadata fields from the current photo being processed into the prompt text, which can help Gemini produce more accurate or useful results.
For example, Gemini will sometimes do a better job at identifying plants and animals if the prompt includes the country in which the photo was taken:
Identify the trees in the photo, which was taken in {Country / Regioin}
This inserts into the prompt the Country/Region metadata field for the current photo (from the Metadata panel’s Location tagset) before sending it to Gemini.
As another example, if you insert the names of people shown in the photo, Gemini will include their names in the result. For example:
Describe what the people are doing. People in the photo: {Child Keywords, People}
This inserts into the prompt all the child keywords of the root keyword People that are assigned to the photo, and Gemini might respond:
John Ellis and Karyn Ellis are sitting on a dock next to a lake watching the sunset.
To insert a token into the prompt text, use the Insert Metadata pop-up menu below the prompt text input box. All of the metadata fields visible in the Metadata panel are available to be inserted. Due to Lightroom limitations, tokens are always appended to the end of the current text, but you can cut and paste them wherever you’d like.
In addition to the standard metadata fields, there are some special tokens:
{Prompt 1} through {Prompt 10} return the values of those Any Vision custom metadata fields for the current photo.
{Child Keywords, parent keyword} inserts all the photo’s keywords that are child keywords of parent keyword. You can specify a path instead of a single parent keyword, e.g. dogs < mammals < animals.
{Child Collections, parent collection set} inserts the collections contained in parent collection set. You can specify a path instead of a single parent set, e.g. France < Trips.
{Child Published Collections, parent published collection set} inserts the published collections contained in parent published collection set. You can specify a path instead of a single parent set, e.g. France < Trips.
{Lua Code, Lua statements ending with return} is for experienced programmers. It executes the Lua statements, using the value from the return statement. See Transform with Lua code for the environment in which the statements are executed. As an example, this token returns the custom metadata field filterTime from the Any Filter plugin:
{Lua Code, return photo:getPropertyForPlugin ("com.johnrellis.anyfilter", "filterTime")}
Advanced Prompt Options
The Advanced tab provides these options:
Previously analyzed photos: Tells Prompt how to handle selected photos that have been previously processed:
– Skip ignores the photos.
– Reassign metadata fields reuses the previous Google result for this exact prompt text and model and executes the metadata actions, without sending the photo to Google, so it’s very fast. This is useful for testing and modifying the actions.
– Reanalyze by sending to Google sends the photo back to Google to get a fresh result. This could be useful for experimenting with the randomness produced by the Temperature option.
Concurrently processed photos: The number of photos that will be processed in parallel by Prompt and Gemini. The default value is about 3/4 of the total number of CPU cores on your computer. If you want to use Lightroom interactively while Prompt is running, choose a smaller value. Larger values may not increase throughput, but it surely depends on your computer and Internet connection.
Default model: The Gemini AI model used to execute prompts that don’t specify a particular model.
Gemini Models
Google Gemini provides many AI models for executing prompts, some stable and some experimental, optimized for different combinations of cost and power. You can set the model used by default in Prompt > Advanced, and you can override the default for a particular prompt with the Changed advanced options prompt action.
Google says the flash models are fast and cheap, with great performance for high-frequency, lower-intelligence tasks, while the pro models are slower and more expensive but give the best performance for a wide variety of reasoning tasks. I haven’t done rigorous testing, but anecdotally I’ve found the flash-lite and flash models give pretty good results with Any Vision’s built-in prompts, though sometimes the pro models do a little bit better. The flash and pro models are generally much more expensive than the flash-lite models—see here for Prompt pricing.
I advise always starting with the latest flash-lite model (the default) and only try the flash and pro model when flash-lite‘s results aren’t good enough.
See Google’s detailed descriptions and documentation of the Gemini 2.0 models.
Custom Metadata Panel Tagsets
Some of the built-in prompts store their results in standard metadata fields such as Caption and Headline, and some add keywords. Many prompts store their results in custom metadata fields named Prompt 1 through Prompt 10, which you can view using the Any Vision > Prompt tagset in the Metadata panel:
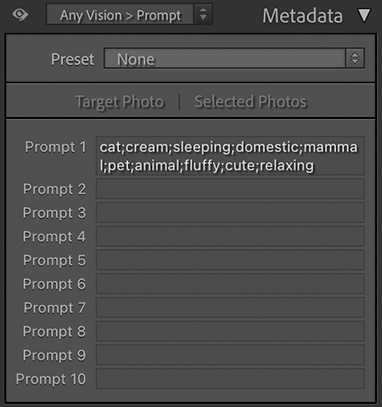
You can make your own custom tagsets showing just the fields you want with more appropriate titles. For example, the built-in prompt Classify real estate photos has a corresponding tagset Real Estate Classification:
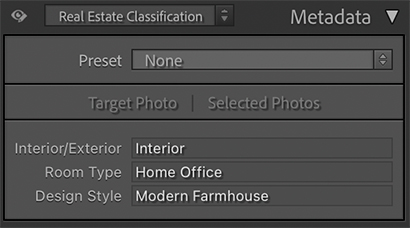
Similarly, the built-in prompts Motorcycle description and Classify cat have corresponding custom tagsets.
To make a new custom tagset:
- In the anyvision.lrplugin folder, copy the file CustomTagset2.lua to MyTagset.lua (or any other name).
- Edit MyTagset.lua in a text editor and change the
title,id, anditems, whose format is perspicuous. - Edit Info.lua in a text editor and add
"MyTagset.lua"to the list ofLrMetadataTagsetFactory. - Restart Lightrom.
You can add standard metadata fields to tagsets, and there are more options for formatting fields. See the Metadata-Viewer Preset Editor plugin or the Lightroom Classic SDK Programmers Guide for details (you don’t need to be a programmer).
Using Classify
Select the photos to be classified and do Library > Plug-in Extras > Any Vision > Classify. Select the features you want to tag and click OK:

Any Vision exports reduced-size versions of the photos, sends them to Google, and processes the results. Typically it takes about 4 seconds per photo (more if you have a slower Internet connection). See Advanced for how to reduce this to 1 second per photo or less, at the expense of making Lightroom less usable interactively while Classify is running.
Once you’ve classified a photo, by default Any Vision won’t reanalyze it. So if you change the set of selected features, doing Classify again won’t have any effect. See Advanced for how to force Any Vision to resend photos to Google to be reanalyzed (at additional cost).
You can see the results in the Metadata panel (in the right column of Library) with the Any Vision > Classify tagset:
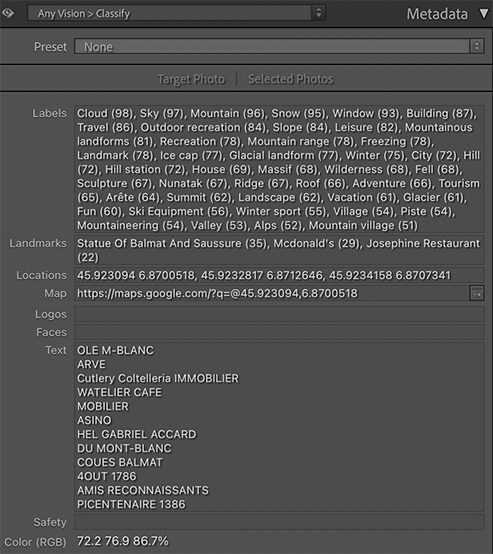
Following each label and landmark is a numeric score, e.g. “mountain (85)”, indicating Google’s estimate of the likelihood of that label or landmark. Faces and safety terms have bucketed scores ranging from “very unlikely” to “very likely”.
Classify can also assign hierarchical keywords using this hierarchy:
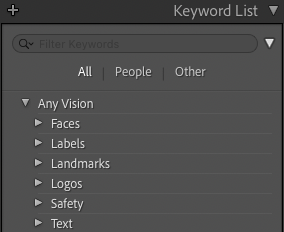
For example, if the photo has the label “mountain”, then the keyword Any Vision > Labels > mountain is assigned to the photo. The Advanced tab lets you control whether keywords are added, specify the root keyword, and whether to put all keywords at the top level.
Features
Labels are objects, activities, and qualities, such as mountain, tabby cat, toddler, safari, road cycling, rock climbing, white. In my main catalog of nearly 30,000 photos, Cloud Vision recognized 2500 distinct labels.
Landmarks are specific locations of where the photo was taken or of objects in the photo. Examples include Paris, Eiffel Tower, Denali National Park, Salt Lake Tabernacle Organ, Squaw Valley Ski Resort, Kearsarge Pass. But landmarks aren’t necessarily famous or well-known—they can be obscure local landmarks, such as statues or waterfalls. Photos may be tagged with more than one landmark. In my catalog, Cloud Vision recognized 500 distinct locations.
Each landmark has a GPS location, and the arrow button to the right of the Map field will open Google Maps on the first (most likely) landmark location in the photo.
Logos are product or service logos, such as Coca-Cola, Office Depot, SpongeBob SquarePants, Tonka. In my catalog, Cloud Vision recognized 110 distinct logos.
Faces: Cloud Vision identifies the “sentiment”, or expression, of each recognized face: Joy, Sorrow, Anger, Surprise. It may also tag a face as Under Exposed, Blurred, or wearing Headwear.
Safety identifies whether the photo is “safe” for Google image search: Adult, Spoof, Medical, and Violence. In my main catalog of 30,000 photos, only 213 received one of these safety tags, and most of them weren’t very accurate. Exposed skin triggers “adult”, regardless of whether it’s a bikini-clad woman, a shirtless teen, or babies in diapers.
Text contains text recognized in photos using optical character recognition (OCR). Cloud Vision appears to do a reasonable job of recognizing text on signs, plaques, athletic jerseys, etc.
Dominant Color. Cloud Vision identifies the ten most “dominant” colors in a photo, using an undocumented algorithm. Use the Sort by Color command to see those colors for a photo and find other photos with similar colors.
Searching
You can search photos’ features using the Library Filter bar, smart collections, or the Keyword List. For example, to find photos assigned the label “mountain”, you could do:

Do Library > Enable Filters if the Library Filter bar isn’t showing, and then click Text.
To search just the Labels field, use this smart-collection criterion:

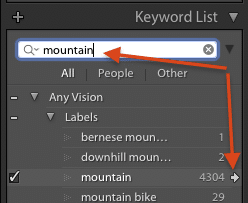
Alternatively, in the Keyword List panel, type “mountain” in the Filter Keywords box, then click the arrow to the far right of the “mountain” keyword:
Advanced Classify Options
The Advanced tab provides more flexibility for using Classify:
Score Threshold: For each label, landmark, logo, etc. Cloud Vision assigns a score, an estimate of the probability it is correct. You can set a per-feature score threshold, and only those labels, landmarks, etc. that have at least that score will be assigned to the photo.
Labels, landmarks, and logos have scores from 0 to 100, though in practice, Cloud Vision returns only those with a score of at least 50. Faces and Safety values have bucketed scores ranging from “very unlikely” to “very likely”.
Assign Keywords:If checked, Any Vision assigns a keyword for each extracted feature. For example, if the photo has the label “mountain”, then the keyword Any Vision > Labels > mountain is assigned to the photo. You can enable or disable this on a per-feature basis.
Text (OCR) copy: Recognized text can be copied from the Text field in the Metadata panel to any Lightroom-recognized metadata field. copy always copies the text, copy if empty copies the text only if the destination IPTC field is empty, append appends the text to the end of the destination IPTC field, and don’t copy never copies the text.
Text (OCR) pattern replacement: Recognized text can be transformed using patterns whose syntax is documented here. For example, to extract just numbers from the recognized text, placing one number per line:
Replace pattern: [0-9]+ with: %0 separator: \n
To extract the first number only:
Replace pattern: ^.-([0-9])+.*$ with: %1
Also see Recognizing Numbers on Race Bibs.
Text OCR model: Specifies the Google text-recognition algorithm. Documents is optimized for documents dense with text, while Photos is optimized for images with small amounts of text (e.g. on signs). My experience is that Documents performs best not only on documents but also on photos, but Google is constantly changing both algorithms.
Include scores in fields: If checked, then the score will be included with each extracted feature, e.g. “mountain (83)” or “Eiffel Tower (94)”.
Set “Include on Export” attribute of keywords: If checked, then each new keyword created by Any Vision will have the Include on Export attribute set, allowing the keyword to be included in the metadata of exported photos.
If you change this setting and want the change to be applied retroactively to all Any Vision keywords: Delete the root Any Vision keyword in the Keyword List panel. Select all the photos you’ve previously classified. Do Classify, click Advanced, and select the option Reassign metadata fields. This will recreate all the keywords with the new setting, without actually sending the photos to Cloud Vision for reanalysis.
Create keywords under root keyword: This is the top-level root keyword of all the keywords added by Any Vision; it defaults to “Any Vision”. Uncheck this option to put all keywords at the top level.
Use subgroups (A, B, C, …) for Labels, Landmarks, and Logos keywords: When checked, Any Vision will create subkeywords A, B, C, … under the parent keywords Any Vision > Labels, Any Vision > Landmarks, and Any Vison > Logos:
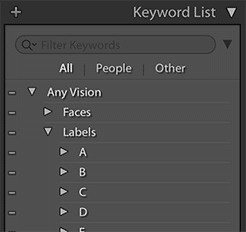
For example, the keyword for the label “mountain” would be placed under Any Vision > Labels > M.
This works around a longstanding (and shameful) Lightroom bug on Windows where it chokes if it tries to display more than about 1500 keywords at once.
Copy landmark location to GPS field: Each landmark assigned to a photo by Cloud Vision has an associated latitude/longitude, displayed in the Location field in the Metadata panel. Selecting Always or When GPS field is empty copies the latitude/longitude of the first landmark (the one with the highest score) to the EXIF GPS field. Once the GPS field is set, the photo will appear on the map in the Map module, and Lightroom will do address lookup to automatically set the photo’s Sublocation, City, State / Province, and Country.
Previously classified photos: This option tells Any Vision how to handle selected photos that have been previously classified:
Skip ignores such photos.
Reclassify by sending to Google sends the photos to Cloud Vision for reanalysis (and additional cost)—you must choose this if you’ve added a feature to be classified.
Reassign metadata fields reassigns the Any Vision metadata fields and keywords using the previous analysis but the current options. This is useful if you’ve changed any of the options that control how the Any Vision metadata fields are set, such as Assign Keywords or Include scores in fields. This option doesn’t incur additional costs for previously classified photos.
Concurrently processed photos: This is the number of photos that will be processed in parallel by Classify and Cloud Vision. The default value of 1 will have the least impact on interactive use of Lightroom (though it could still be a little jerky). The maximum value of 8 processes photos about 4 times faster, though interactive use will likely be very jerky. (In my testing, larger values didn’t provide any more speedup.)
Translation
By default, labels and other features are returned by Classify in English, but the Translation tab lets you translate them to another language. You can specify which features should be translated; features not selected will remain in English.
Any Vision uses Google Cloud Translation, the same technology behind Google Translate. More than 100 languages are supported.Translation does cost additional, but it is quite inexpensive. Any Vision remembers previous translations, so you only pay once for each distinct word or phrase.
You can override the translations of specific words and phrases with an overrides dictionary. Click Edit Overrides to open Finder or File Explorer on the dictionary for the current language (e.g. de.csv for German). The dictionary is in UTF-8 CSV format (comma-separated values), and after the header each following line contains a pair of phrases:
word or phrase in English, word or phrase in target language
The words and phrases are case-senstive. Make sure you save the file in UTF-8 format:
Excel: Do File > Save As, File Format: CSV UTF-8.
TextEdit (Mac): After opening the file, change it to plain text via Format > Make Plain Text. It will save in UTF-8 format.
Notepad (Windows): Do File > Save As, Encoding: UTF-8.
Sort by Color
When the Dominant Color feature is selected, Cloud Vision finds the ten most “dominant” colors in a photo, using an undocumented algorithm. You can see those colors by selecting a classified photo and doing Library > Plug-in Extras > Sort by Color:
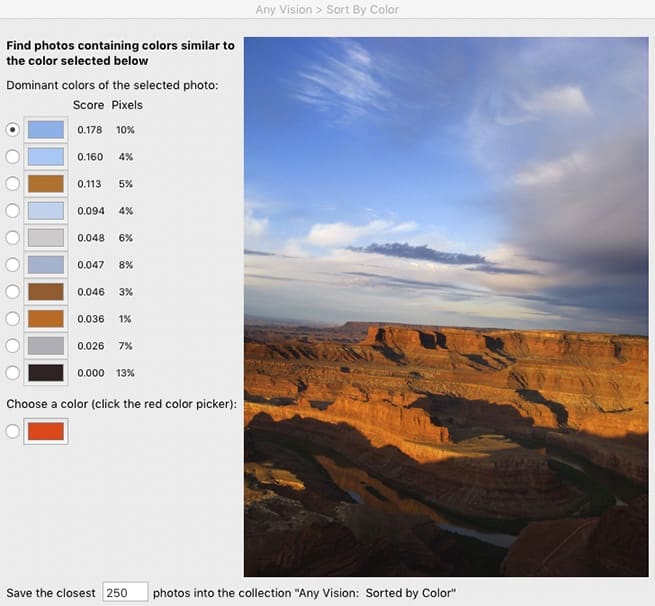
To find other photos containing a similar dominant color, select all the photos you want to search and invoke Sort by Color. Choose one of the dominant colors of the most-selected photo, or use the color picker at the bottom left to choose another color, and click OK. The current source is changed to the collection Any Vision: Sorted by Color, containing those photos with the most similar dominant colors. Do View > Sort > Custom Order to sort the collection by similarity.
Here are the photos from my main catalog of 30,000 photos with dominant colors closest to the orange-brown chosen in the example photo above:
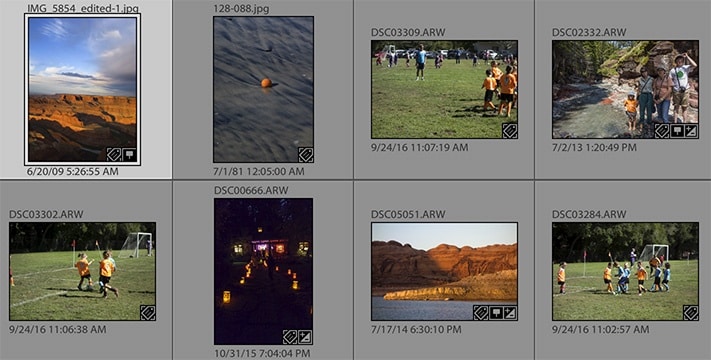
As another example, here are photos from my catalog labeled “sunset” by Cloud Vision, sorted by similarity to the yellow-orange from the first photo:

Find with Similar Labels
Find with Similar Labels finds photos with similar visual content by comparing the labels assigned by Classify. This can help find duplicates and near duplicates even if they’re missing metadata, are in different formats (e.g. raw and JPEG), or have been edited or cropped. For example, in a catalog of 32,000 photos, Find discovered these two photos taken three years apart:

Each group of similar photos will be placed in a separate collection in the collection set Any Vision: Similar Labels.
To find near duplicates, set Similarity initially to 95. If that finds too many photos that aren’t near duplicates, try 98 or 99.
If you set Similarity to less than 95, Find can go much slower when run on tens of thousands of photos. You can speed it up considerably by reducing the Include slider from 100%, causing Find to go much faster at the cost of not finding as many similar photos. (The percentage of how many similar photos may be found is a crude estimate.)
Find is only as good as the labels assigned by Cloud Vision. It often does an amazing job at finding near duplicates, but sometimes it’s hilariously bad.
Exporting to a File
To export the results from Prompt or Classify to a comma-separated (CSV) text file, one row per photo, select one or more classified photos and do Library > Plug-in Extras > Export Prompt Results to File or Export Classify Results to File. Open the file in Excel or another spreadsheet program.
Remove Fields
The Remove Fields command removes from the selected photos all custom metadata fields added by Any Vision (but not any keywords). If you run this command on a large number of photos, you may wish to do File > Optimize Catalog afterward to shrink the size of the catalog by a modest amount.
Recognizing Numbers on Athletes’ Bibs and Cars
Both Prompt and Classify do a decent job recognizing numbers on athletes’ bibs and cars if they’re unobscured and facing the camera. In my limited testing, I think Prompt does a little better with partially obscured or angled numbers and unusual fonts. Both commands make it easy to store the numbers in metadata fields and keywords.
With Prompt
Use the built-in prompt Atheletes’ bibs or Dirt bike numbers, which stores the extracted numbers one per line in the Prompt 4 field and in keywords. If you want the numbers stored in another field or not stored in keywords, edit the prompt and change the actions.
If you’re working with cars or motorcycles, you might get slightly better results if you edit a copy of the prompt and change it to refer to “car” or “motorcycle”.
With Classify
In the Advanced tab, check the option Text (OCR), with these options:
Replace pattern: [0-9]+ with: %0 separator: \n
This will extract just the numbers from all the recognized text in the photos, one per line.
To search for a bib number, do the menu command Library > Find to open the text search in the Library Filter bar and use the criterion Any Searchable Plug-in Field contains number. Or create a smart collection with the criterion Searchable Text contains words number.
To create keywords for the bib numbers, check the option Assign keywords from text separated by , ; newline. If you’ve checked the option Create keywords under root keyword, these bib-number keywords will appear under the parent keyword Any Vision > Text; otherwise, they’ll appear at the top level.
To copy the bib numbers to the Caption field, set the option:
Text (OCR) copy to Caption
You can instead copy to the Title, Headline, or Source fields.
Similar Services
You may wish to consider these alternative products:
Excire is a sophisticated AI application that integrates with Lightroom. It has keywording and search capabilities similar to Classify plus much more. It doesn’t use the cloud and it has a much higher one-time upfront cost with no recurring charges.
LrGeniustagAI uses Google Gemini, ChatGPT, or Ollama to generate keywords, titles, and captions. The plugin costs $15, and you’ll need a free or paid Gemini, ChatGPT, or Ollama license.
MetaMagic uses OpenAI (ChatGPT) to generate keywords, titles, and captions. It charges per photo.
LrTag tags your photos like Classify, but it has a monthly charge.
MyKeyworder is intended as an aid to careful keywording of smaller numbers of photos rather than searching large catalogs. It has recurring charges.
Lightroom Cloud (but not Lightroom Classic) uses similar technology to search your photos, but it doesn’t display or assign the keyword terms it’s inferred. Some people sync their Lightroom Classic with the Lightroom Cloud and search for photos there.
Keyboard Shortcuts
Use Any Menu to invoke any plugin menu item with just a few keystrokes and assign single-letter quick keys to the most-used menu items. Alternatively:
Windows: You can use the standard menu keystrokes to invoke the Classify and Prompt commands. ALT+L opens the Library menu, U selects the Plug-in Extras submenu, and C invokes the Any Vision > Classify command and P invokes Any Vision > Prompt.
To reassign a different final keystroke to an Any Vision command, edit the file Info.lua in the plugin folder. Move the & in front of the desired letter in the menu command’s name, changing the name itself if necessary.
To assign a single keystroke as the shortcut, download and install the free, widely used AutoHotkey. Then, in the File Explorer, navigate to the plugin folder anyvision.lrplugin. Double-click Install-Keyboard-Shortcut.bat and restart your computer. This defines the shortcut Alt+A to invoke the Classify command. To change the shortcut, edit the file Any-Vision-Keyboard-Shortcut.ahk in Notepad and follow the instructions in that file.
Mac OS: In System Settings > Keyboard > Keyboard Shortcuts > App Shortcuts, click + to add a new shortcut. In the Application menu, tediously scroll to the bottom and select Other… Navigate to Applications > Adobe Lightroom Classic and select Adobe Lightroom Classic.app. In Menu title type three spaces followed by the name of the menu command, e.g. “Prompt” (case matters and don’t enter the quotes). In Keyboard shortcut type the desired key or key combination.ion.
Support
Please send problems, bugs, suggestions, and feedback to ellis-lightroom@johnrellis.com.
I’ll gladly provide free licenses in exchange for reports of new, reproducible bugs.
Known limitations and issues:
- If you get the error “Google error: models/gemini-2.5-flash-preview-05-20 is not found…”, update to the latest version of Any Vision. On 11/19/2025, Google retired older Gemini AI models, and Any Vision didn’t handle it gracefully.
- Any Vision requires Lightroom 6.14 (CC 2015) or Lightroom Classic—it relies on features missing from earlier versions.
- If you’re upgrading from an older version of Any Vision and see the error “Google error: Generative Language API has not been used in project…”, complete these steps.
- If Prompt gives Gemini “recitation” errors or says the maximum number of tokens was reached, try adding the action Change advanced options to the prompt and increasing Temperature above 0. Even a small value of 0.1 might be enough to avoid the error.
- Like other such cloud services, including Adobe Firefly, Gemini (Prompt) has overly sensitive filters for prohibited content, including obscenity and pornography. Lots of exposed skin and innocent photos of children are sometimes flagged incorrectly. These services would rather prohibit too much than too little, to avoid political and legal blowback.
- As of 3/21/23, you may see the error “Google error (13): Internal server error. Unexpected feature response”. This bug has been acknowledged by Google but not yet fixed. On average, it seems to occur in about one of every couple hundred photos. You can usually avoid the bug by unchecking the Landmarks feature. On 8/22/23, Google Cloud Support said that Google engineering is still working on the issue but there is no ETA.
- If the Any Vision window is too large for your display, with the buttons at the bottom cut off, do File > Plug-in Manager, select Any Vision, and in the Settings panel, check the option Use Any Vision on small displays. Unfortunately, a bug in Lightroom prevents plugins from determining the correct size of the display..
- Unlike many photo-sharing services, with Google Gemini and Cloud Vision your photos remain exclusively your photos. For free usage of Gemini (Prompt), Google will use your photos for improving their products. But for paid Gemini and for Cloud Vision (Classify), Google promises not to process your photos for any other purpose. See their Data Processing and Security Terms.
- Classify infrequently returns errors such as “The request timed out” and “Image processing error!”. If this occurs, just rerun Classify. I don’t know why these errors occur—they appear spurious.
- When your keyword list has multiple keywords of the same name, Lightroom distinguishes them in the Keyword List panel using the notation child-keyword < parent-keyword. For example, if you have an existing keyword “House” and Any Vision adds the label keyword “House”, the latter will be displayed as House < Labels to distinguish it from the top-level House. But these two keywords will get exported in photo metadata simply as “House”.
- Why is there no prompt for generating the Title metadata field? Any Vision follows the IPTC standard, which defines Headline as a “brief synopsis of the caption” and defines Title as a “short human readable name, which can be a text and/or numeric reference”. But many use Title for storing a short synopsis. If you want a brief synopsis stored in the Title metadata field rather than Headline, make a copy of the built-in prompt IPTC Headline, edit it, and change the Copy action to store the result in Title rather than Headline.
Version History
1.2
- Initial release.
1.3
- The Use subgroups for keywords option now correctly handles keywords starting with non-English characters.
- Recognized text can optionally be copied to an IPTC field.
1.4
- Better handling of errors reported by Google, such as an expired credit card.
- Pattern replacement for transforming recognized text, e.g. to extract jersey numbers.
- Translation of features to other languages. See Support for how to enable the Google Cloud Translation API.
1.5
- You can now specify a root keyword other than “Any Vision” on the Advanced tab.
- Fixed a bug preventing recognized text in other languages being translated to English.
- Now ignores missing photos instead of giving a cryptic informational message.
- Works around obscure export bug in Lightroom 5.
1.6
- The progress bar updates more incrementally with very large selections.
1.7
- Dense multi-column text is handled better.
- Classify is a little faster.
1.8
- Remove Fields command removes Any Vision custom metadata from catalog.
- Better handling of spurious errors from Google Cloud Vision.
- Increased maximum value of Concurrently processed photos to 8.
1.9
- Advanced option OCR model for choosing which Google text-recognition algorithm to use.
1.10
- Made the default for the advanced option OCR model to be Photos, which experiments confirm performs better than Documents when analyzing photos containing signs, t-shirts, etc.
1.11
- Find with Similar Labels finds photos with similar visual content by comparing their labels.
1.12
- Worked around Lightroom bug creating keywords for labels.
- Provided option for running Any Vision on small displays, necessitated by Lightroom 10’s change of fonts.
1.13
- Create top-level keywords by unchecking the Advanced option Create keywords under root keyword.
- Create keywords from recognized text (OCR) with the Advanced option Assign keywords from text.
- Added guide to recognizing numbers on athlete’s race bibs.
- Fixed Export to File to export recognized text after applying any pattern replacements, not the original text.
- Silently skips over missing photos rather than giving an obscure error.
1.14 2023-03-21
- Correctly handles “Internal server error” responses from Google Cloud Vision.
1.15 2023-11-23
- Help button works again.
- Better logging of unexpected responses from Google.
1.16 2024-05-16
- Better error messages when Lightroom fails to export a photo being analyzed.
- Shows how many selected files will be skipped because they’re missing or videos.
- The temporary folder contain the exported reduced-resolution images sent to Google is once again deleted correctly.
- Correctly handles when the translation-cache file gets deleted from outside Lightroom.
1.17 2024-08-25
- Smart previews can once again be analyzed.
- Minor internal code improvements.
1.18 2024-09-05
- When you install the plugin, you must now get a Google Cloud key to use the free trial of 50 photos. The Cloud key will let you analyze tens of thousands of photos for free (after buying an Any Vision plugin license). Previous versions provided a free-trial Google Cloud key, but hackers abused that (costing me money).
1.19 2024-12-05
- Added the Prompt command, which uses Google’s Gemini AI to describe and classify photos and videos using text prompts you write. If you’re upgrading from an older version of Any Vision, you’ll need to complete these steps to upgrade your Google API key.
- The old Analyze command is now called Classify.
- Increased the number of photos in the free trial to 200, to accommodate the necessary experimentation required to learn and evaluate Prompt.
- The old Export to File command is replaced with Export Prompt Results to File and Export Classify Results to File.
- Added many more metadata fields to which Classify can copied recognized text.
1.20 2024-12-31
- Prompt: Insert photo metadata, such as keywords or locations, into the prompt text before it gets sent to Gemini, helping increase the accuracy and relevance of the response.
- Prompt: Select multiple prompts to copy, delete, move, enable, or disable all at once. Click the first prompt, cmd/ctrl-click additional prompts, or shift-click to select all prompts in between.
- Prompt: Added the model gemini-2.0-flash-exp, Gemini 2.0 experimental preview, subject to unannounced changes; free, rate-limited use only.
- Prompt: The Transform with Lua code action includes a built-in function
parseJSONfor parsing strings containing JSON-syntax objects.
1.21 2025-02-21
- Four new Gemini 2.0 models for Prompt, two stable and two experiment. The model gemini-2.0-flash is the new default. That model is considerably more expensive than the prior default gemini-1.5-flash-8b, so if cost is an issue, consider, gemini-2.0-flash-lite. See Google’s descriptions of Gemini 2.0.
- Prompt now defines a default model (on the Prompt > Advanced tab) used to process all prompts that don’t override the default in the prompt’s Change advanced options action. Prompts created prior to version 1.21 will be changed to Model: default unless they explicitly specified gemini-1.5-pro.
- A new built-in prompt Exposure and Focus assigns the Any Vision > Exposure keywords Well-Exposed, Overexposed, or Underexposed, and the Focus keywords In Focus, Slightly Blurred, or Very Blurred. Click Prompt > Add Built-in to add the new prompt.
- Fixed bug deleting the last prompt in the Prompt window.
1.22 2025-05-12
- Fixed bug with adding the same keyword from two different prompts processed at the same time.
- You can now Export and Import one or more prompts as text files, useful for sharing with other people or Lightroom installations.
- The Copy to field action now has the option From JSON output for use with JSON schemas. Using a schema often stops Gemini from generating introductions like “Here is a caption:” and other extraneous text.
- The built-in prompts Caption / IPTC Description, IPTC Headline, IPTC Alt Text, and IPTC Extended Description now use JSON schemas and shouldn’t generate extraneous text like “Here is a caption:”.
- New built-in prompt Embedded timestamp extracts timestamps visually embedded in photos and videos, using the format yyyy-mm-dd.
- New built-in prompts Cat description and Classify cat for describing and classifying domestic cats according to breed, fur color, paw color, eye color, hair length, and kitten/adult. The custom metadata tagset Cat Description displays the labeled fields.
- You can have “text only” prompts that don’t send the photos to Google for processing, useful for prompts that generate output based soley on metadata fields. To prevent a photo from being sent to Google, in the Change advanced option action, set Image size to 0 pixels.
- Added the Gemini 2.5 preview models gemini-2.5-flash-preview-04-17 and gemini-2.5-pro-preview-05-06. They don’t allow free usage, and they’re subject to unannounced changes by Google.
- Older Gemini models won’t appear in the Model drop-down menus, but if you type them in, they’ll be accepted, and prompts can still refer to them.
- For advanced users only: You can add the most recent Gemini models by editing the file
GeminiModels.luain the plugin folder. I try to add the production models very soon after Google releases them, but it could take a while before I add the experimental models. See more details at the top of the file.
1.23 2025-06-12
- The Remove Fields command now lets you remove just the cached responses from Google while leaving custom metadata fields untouched.
- Prompts can copy to GPS, GPS Direction, and GPS Altitude. (Google Gemini can generate GPS coordinates for landmarks and well-known locations.)
- The advanced Prompt option Analyze one video frame every n seconds changes how frequently Gemini samples video frames to analyze. The default is 1 frame every second. Supposedly, setting n to a larger value will speed up Gemini’s analysis by sampling fewer frames, while setting it to less than n will give more accurate analyses that don’t miss fast action. However, in my testing with the Gemini 2 models, I couldn’t see any difference. Let me know if you do.
- Added new models gemini-2.5-pro-preview-06-05 and gemini-2.5-flash-preview-05-20. The older models gemini-2.5-pro-preview-05-06 and gemini-2.5-flash-preview-04-17 are still available but soon will be deactivated by Google.
1.24 2025-06-17
- Worked around bug in the Gemini 2.5 preview models triggered by changes in Any Vision 1.23.
1.25 2025-08-18
- Added the final Gemini 2.5 models: gemini-2.5-flash-lite, gemini-2.5-flash, gemini-2.5-pro. The new default model is gemini-2.5-flash. But if you’re upgrading from a previous version of Any Vision, the default model won’t change automatically—go to the Advanced tab of the Prompt command to change your default model. The older 2.5 preview and experimental models are still available (for now), but they’re no longer visible in the Prompt menus.
- New built-in prompt Landmarks and Places with GPS is the same as Landmarks and Places, except that it also sets Lightroom’s GPS field to the coordinates provided by Gemini. If Gemini guesses the write landmark or place (it often makes mistakes), then the GPS coordinates are usually accurate.
1.26 2025-08-24
- Fixed inaccurate display of the estimated cost per 1000 photos shown by Edit Prompt > Preview Result. The inaccuracies occurred with prompts using the default model and were typically off by a factor of two or so.
1.27 2025-08-25
- Additional corrections to the estimated cost of a prompt with the Gemini 2.5 models, working around a bug in Google documentation.
- The default model is now gemini-2.5-flash-lite, which can be ten times cheaper than gemini-2.5-flash, which in turn can be five times cheaper than gemini-2.5-pro. If you’re upgrading from a previous version of Any Vision, the default model won’t change automatically—go to the Advanced tab of the Prompt command to change your default model.
- Updated the pricing information for the Gemini 2.5 models.
1.28 2025-10-01
- Handles non-conforming Gemini JSON output for empty keywords.
- Handles non-conforming JSON output from gemini-2.5-flash-lite that begins with
```json. - Worked around SDK bug on Windows that made the Copy action field Having these names (comma-separated) very narrow.
1.29 2025-11-07
- The built-in prompt Taxonomic identification of plant or animal identifies the common and scientific names for a plant or animal and assigns hierarchical keywords, e.g.
Dogand …> Canidae > Canis > Canis familiaris. - The Lua function
hierarchy()helps create hierarchical keywords from the flat keywords returned by Google Gemini. See the new prompt above for an example. - Changed the AutoHotkey script Any-Vision-Keyboard-Shortcut.ahk to AutoHotkey 2 syntax.
1.30 2025-11-19
- Fixed the Prompt error that resulted when you tried to enter a Google key. (Google decommissioned several old models today, and Any Vision was accidentally using one of them to validate Google keys.)
1.31 2026-01-17
- Worked around Google flakiness causing “Quota exceeded” errors when you enter a Google key.